Tweet
Tweet
what is cpanel
This tutorial will guide you on how to setup hotlink protection in cPanel. For the purpose of this guide, we'll presume that you're currently in cPanel hosting and therefore are viewing the primary display.
Let us begin to learn how to setup hotlink protection in cPanel. Setting up hotlink protection, viewers cannot link directly to images on your website. Scroll down the cPanel hosting screen and select the HotLink Protection icon under the Security section of your cPanel hosting screen. Once you have selected HotLink Protection a new display will appear the HotLink Protection page. Hotlink protection prevents other websites from directly linking to certain files (typically images) on your website. You will want to prevent this if you have copyrighted images or to simply save on bandwidth usage.
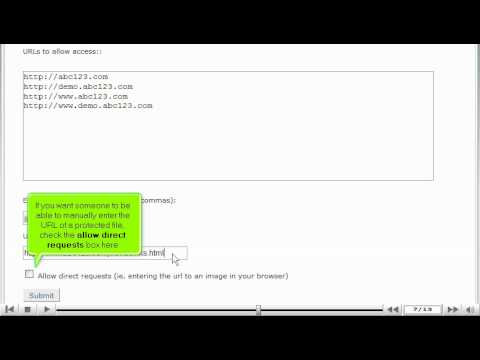
You may begin by making sure your sites are listed in the section of the Configure Hotlink Protection beneath the URLs to allow access, so that you are able to hotlink your images. Scroll down your screen to the Extensions to allow box where you will enter all the file types you want protected such as jpg, jpeg, gif, png, bmp. Then enter a URL you wish to redirect to, for anyone who tries to hotlink your files and/or images (e.g., http://www.abc123.com/nohotlinks.html). If you wish for someone to be able to manually enter the URL of a protected file, you may check the box below labeled as Allow Direct Requests. Finally, select the Submit button to submit your Hotlink Protection.
A new display will appear with confirmation that the HotLink Protection has been enabled. Under the Allowed Referers will list only the websites which can hotlink to the file types shown next to Protected Extensions.
Let's go back to the HotLink Protection page, by selecting the Go Back button.
Within this screen you will notice that HotLink Protection is currently enabled and next to this appears a box labeled Disable. By selecting Disable your screen will automatically refresh to a confirmation that the Hotlink protection has now been disabled.
You can return to the HotLink Protection page to re-enable HotLink Protection or add/remove file types to the protected list at any time.
Select the Home icon on the top left of the screen to return to the main page of the cPanel hosting screen. This is the end of the tutorial. You now know how to setup hotlink protection in cPanel.
If you need any further assistance on how to setup Hotlink Protection in cPanel,
please feel free to ask them on this thread!
How to use IP deny manager in cpanel