Tweet
Tweet
what is cpanel
This tutorial will guide you on how to setup a cron job in cPanel. For the purpose of this guide, we'll presume that you're currently in cPanel hosting and therefore are viewing the primary display.
Let us begin to learn how to setup a cron job in cPanel. Scroll down the cPanel hosting screen and select Cron jobs under the Advanced category of your cPanel hosting. Once you have selected Cron jobs a new display will appear the Cron Jobs page. There are two ways to setup a cron job in cPanel; there is an easy way and a hard way. Let's choose the easy way by selecting the Standard button underneath.
Your page shall then refresh to a new display where you may adjust the Standard Cron Manager. Every time a cron job runs, the output results of the cron are sent to an email address. Type the email address (where you want the cron result sent) into the provided box on the top right of the screen. Once you have done so you may continue by entering the command of the script you want to run, including the path from root.
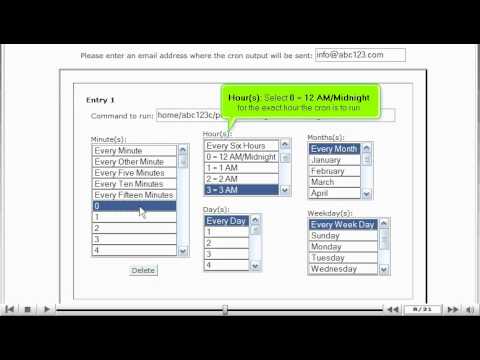
We are going to run a script called clients.cgi which is located in the cgi-bin directory of this account. The username for this account is abc123c. Begin by inputting the command into the provided box Command to run: (Example: home/abc123c/public_html/cgi-bin/clients.cgi). Next specify the timing of this cron such as when and how often we want the script to run.
In this example we want the clients.cgi script to run at 12:00 am (midnight) on the first Sunday of each month.
Minute(s) - Select 0 for the exact minute the cron is to run (on the hour) under the Minute list.
Hour(s) - Select 0 = 12am for the exact hour the cron is to run under the Hour list.
Day(s) - Select 1 to have the cron run on the 1st day of the month under the Day list.
Month(s) - Select every Month that the cron runs every month under the Month list.
Weekday(s) - Select Sunday for that the cron runs every Sunday under the Weekday list.
Once you have finished, select the Save Crontab.
A new display will appear verifying that the cron job has been updated. The cron job has now been set and will run every Sunday at 12:00 AM Midnight.
Let's go back to the Cron Jobs page, by selecting Go Back. Now select the Standard button again. As you can view, we can return to this screen if you ever want to edit or delete an existing cron jobs or you can setup additional cron jobs by inserting into the next Entry.
If you wish to delete the cron job that was created, just select Delete for the Entry you wish (Entry 1). You will automatically be given verification that the cron job has been deleted.
Let's go back to the Cron Jobs page, by selecting Go Back. Let's just take a quick look at the advanced method of creating a cron job, by selecting the Advanced (Unix Style) button. This method should only be used if you know exactly what you are doing as it is not as clear as the standard method.
You can create as many cron jobs as you wish, but please keep in mind that cron jobs have the potential to take up a lot of server resources.
Select the Home icon on the top left of the screen to return to the main page of the cPanel hosting screen. This is the end of the tutorial. You now know how to setup a cron job in cPanel.
If you need any further assistance on how to setup a Cron Job in cPanel,
please feel free to ask them on this thread!
How to create a FTP account in cpanel