
 Tweet
Tweet
By Navaldesign – http://www.dbtechnosystems.com
BV now offers a simple PHP, file based Login system. This system allows you to create a member’s archive and protect your pages so that only registered members can have access to them. It also allows members to reset their password, in case they have forgotten it, and to change their password.
It provides you with the necessary tool to administrate your members archive by being able to delete, or edit a user’s details, including his “status”.
Since this script is based on PHP code, all the script pages, as well as the protected pages MUST be set to have the .php extension.
Visual customization of the objects that form the script, is quite intuitive and you can experiment yourself. I will limit in explaining how you can setup correctly the script and how you can create the necessary file database, and will provide a generic procedure for the visual customization at the end of this tutorial.
What the script can do and what it can’t do (Please read!) :
As mentioned, the script allows you to create a members database and password protect the pages you like, so that only registered members can get access to them. It also provides a “Single Protect” object (tool) which allows you to password protect a page with a hardcoded password (the password is included in the protection code, and it is not included in the members database file). It is based on a flat file, in other words on a text file that contains the members details. As such, the database file MUST have a “strange” name in order that no one will be able to guess the file name and retrieve the members details. However, for security purposes, the passwords are encrypted before being stored in the file.
Activation of each account can be either immediate (the “status” is set to “Active” ), or manual, after the Administrator reviews the account details. It doesn’t distinguish members in groups, so you can’t set different access levels, nor does it support paid memberships, meaning that if you want members to pay, you need to create payment buttons, and manually set the account status to “Active” after you have payment confirmation.
The script can’t accept additional fields. It will not allow for searches (queries), nor will it allow for members Profile Pages or Members List (at least not for now). It also will not allow you to redirect each user to a specific page of his own (though I will display, at a later stage, a method for doing this, if necessary).
Functionality:
The script consists in a number of objects that each allows you to achieve a specific task. EACH object must be in a page of its own, so don’t add multiple objects in a single page. Let’s see the available objects:
1. The Signup object:
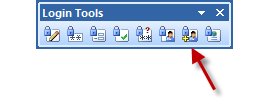 Picture 1.
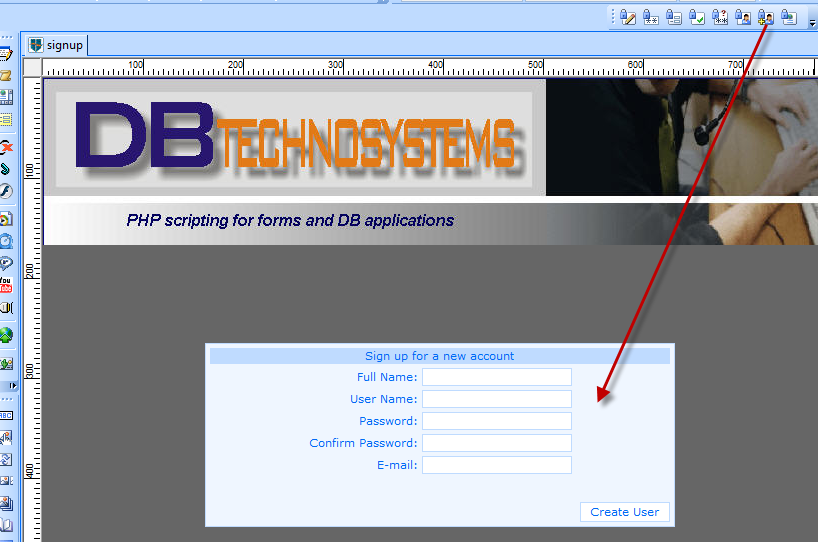
This object allows potential members to signup themselves. So you need to create a page that will allow them to do so. Let’s call this page with the same name as the object, “signup”. Drag the object in your page.
When you do, the object will create in your page, a “signup” form ( see Picture 2).
The available fields, are: Full name, Username, Password, Confirm Password, Email. Each of these titles can be changed through the object properties dialog box. Just double click the object and set the labels as you wish.
You can also set up the text of the error messages, as well as your email address (where you will receive a notification email upon a new registration.
Of course, you will need to add a link from your other pages to this page, so if a visitor wants to register he can click and get redirected to this page.
The MOST important thing about this page, is the database file creation. To create the members database file, double click the object and the properties dialog box will appear (see Picture 3).

As you can see, in the very bottom, left, there is a button “Create Database…”.
Click it and BV will display the window seen in Picture 4:

Do NOT leave the default name (usersdb.php). Provide a “strange” name like “my_strange_name_db.php” or “users_953Alpha_Mysite_.php” for security reasons.
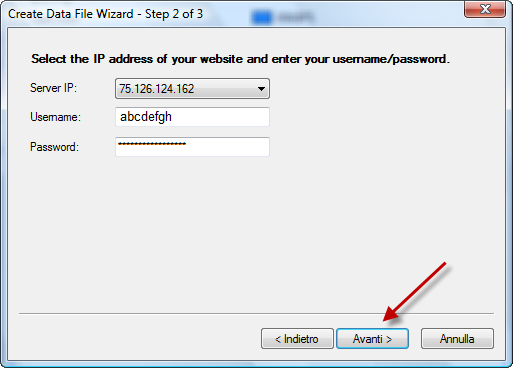
Click on “Next”. You will see a window similar to the one used for publishing. Select your IP address and fill in your hosting account username and password, then click on “Next” (See Picture 5).
BV will connect to your site and will display all available folders in the root directory. Double click on “public_html” . After that, when the list of folders under ”public_html” appears, click on “Finish”.

If the login script is installed on an add-on domain, you should take one more step, that is, double click the add-on domain folder name, before clicking on “Finish”.
At this point, BV will create an empty Database file with the name you have selected. You should write down the filename that you used, as you will need it for the other objects of the script.
Just for verification purposes, connect to your hosting account with FTP and browse to see if the file has been correctly created. Check also that its permissions are set to 644.
Important: when a user signs up, the script will add his details in the database file. At this point, there are three things that worth mentioning (see Picture 7):
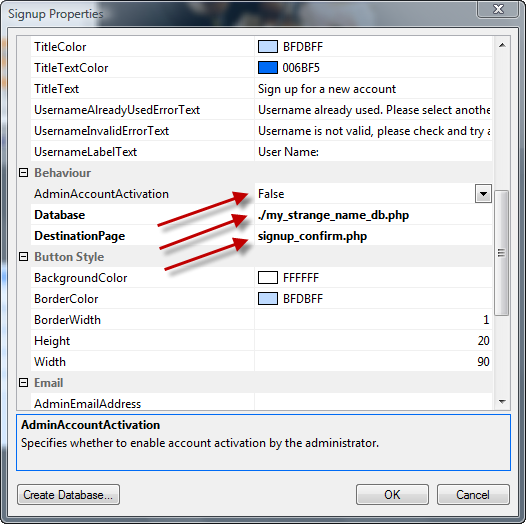
AdminAccountActivation: Setting it to False will result in automatic activation of the new account (Status = Active) , setting it to True will instead result in setting the account status to “Not Active”. If you want to review the new account details before it becomes active, you should set it to “True”.
Database: you should provide the database filename as you have created it.
Destination Page: This is the page that the new member will see after he signs up. Depending on the activation you have selected, you should prepare a page that will inform the new member that his account is active OR that his account will be reviewed by the Administrator before activation. With reference to the above picture I have named this page “signup_confirm.php”.
If everything is ok, your signup page is ready (of course, you might want to proceed to visual customization of the page and object, but we will not further extend on this).
2. The Login object:

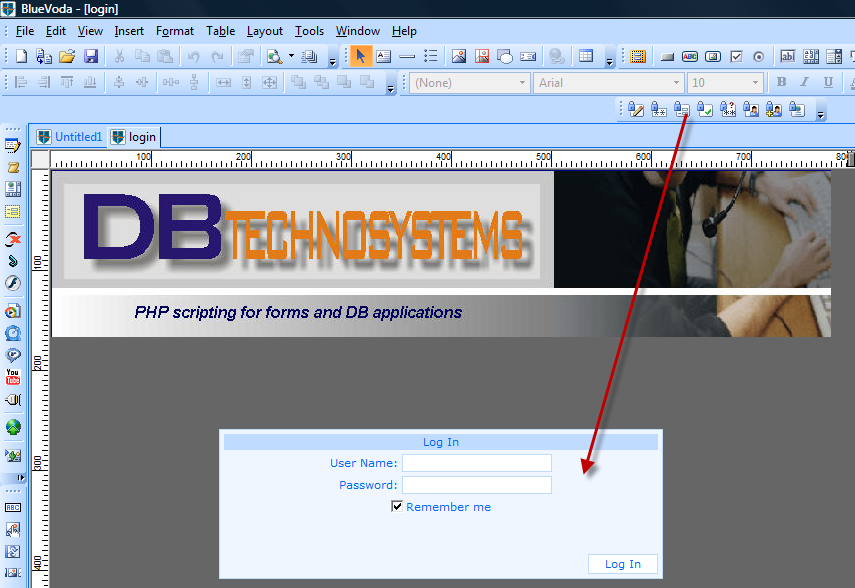
This object will create the necessary login form for your members to login (see Picture 9). You can set the text titles and customize it visually as required by double clicking it and setting its properties as required. To do this, double click the object and the properties window will appear (see Picture 10).
The important things are:
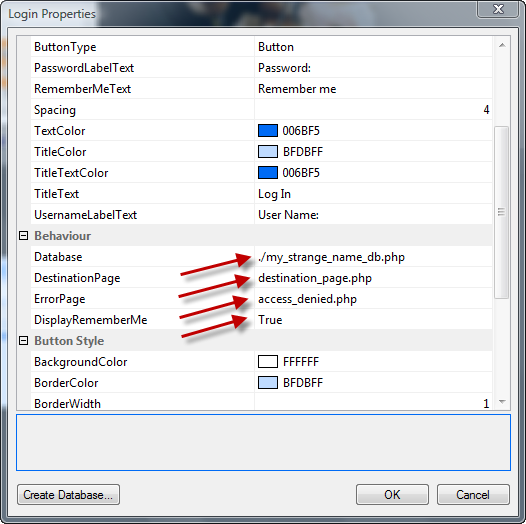
Database: this is the database filename, as you have created it, in our example it is “my_strange_name_db.php”
Destination Page: This is the page where users will be redirected after a successful log in. This should be the member’s “homepage” with a menu that will allow members to navigate through the protected pages. In our example, we have called it “destination_page.php” but it can be any page you wish.
Error Page: this is the page where the members will be redirected if the log in is not successful (wrong details, or non existing details). This page should simply contain a message to the member saying that he either typed in wrong details, or he is not registered. Usually, in this page, you should also have a link to the registration page and the “Forgot Password” page. In this tutorial, we have named this page “access_denied.php” but you can name it whatever you like.
Display RememberMe: This option can be set to True or False. Depending on your choice, the Log In form will display or not, a checkbox for the well known “Remember me” feature.
3. The Forgot Password object:
This tool allows your members to reset their password. Since the passwords are stored in the database file in encrypted format, there is no way that the script can actually re-send the current password to the user. So, this tool will reset the password to a new, random one, and will email it to the member. The member will then use this password to Log In, and then he can change the password to whatever he likes (see next paragraph).
The tool will create a form with only an “Email” field and a Submit button.
The member will type his registered email address, and the script will browse through the database file to see if it finds such an email address. If it does, it will reset the password and send an email address to that email address.
As with all other objects, you can visually customize the object. Important points(see Picture 13):
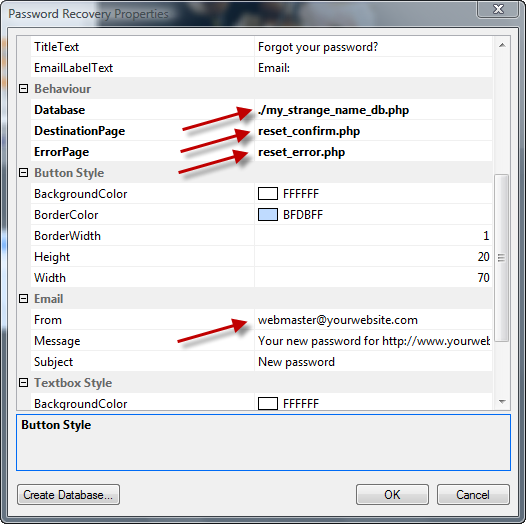
Database: this is the database filename, as you have created it, in our example it is “my_strange_name_db.php”
Destination Page: This is the page where users will be redirected after a successful password reset. This should be a page with a message like ”Your password has been successfully reset, and emailed to your registered email address Please use the new Password to Log In, then you can change your password to whatever you like”. In our example, this pages is named “reset_pass.php” but you can name it whatever you like.
Error Page: this is the page where the members will be redirected if the Password Reset is not successful (wrong or non existing email address). This page should simply contain a message to the member saying that he either typed in wrong details or this email address is not registered in the database. In this tutorial, we have named this page “reset_error.php” but you can name it whatever you like.
From: This is the email address that will appear as the sender of the email. Should be your own, real, email address.
4. Change Password object:
Picture 14
This object allows your members to change their password on their own. It will create a form in your page, as seen in Picture 15:

As with all other objects, you can customize the labels (titles) of the fields, as well as colors and fonts. To do so double click the object and the following Properties Window will appear:
 Picture 16
You need to provide, as we did before, the database filename and the Destination page. This page should be a page informing your member that he has successfully changed his password.
5. The Log Out object:
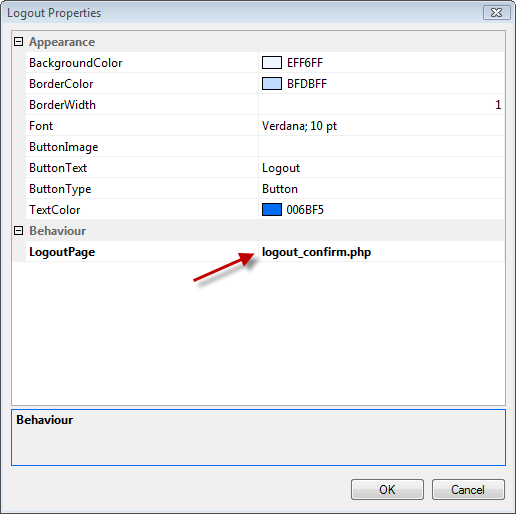
This object allows your members to Log out. It will create a form in your page, as seen in Picture 18:
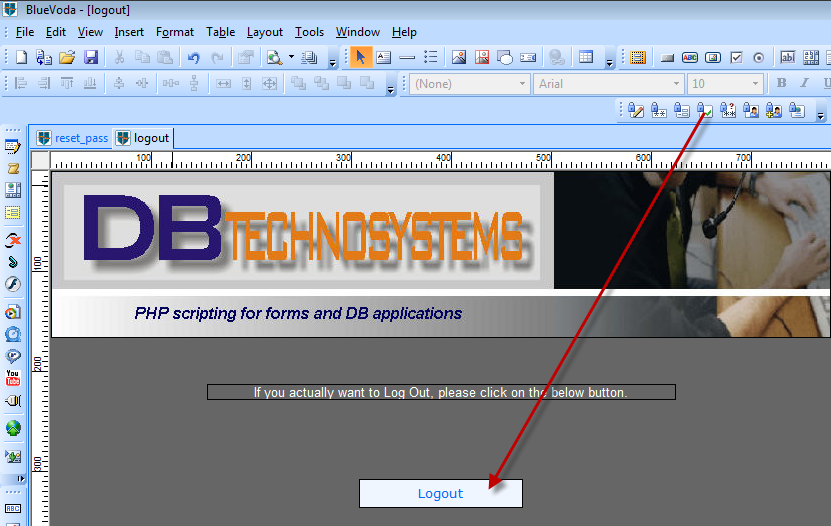
There are no particular settings for this object, other than the visual ones and the Logout page (see Picture 19). The Logout Page should be another page, with a message to let your member know that he has been logged out, OR it can be any other of the non protected pages (in example, your “index” page).
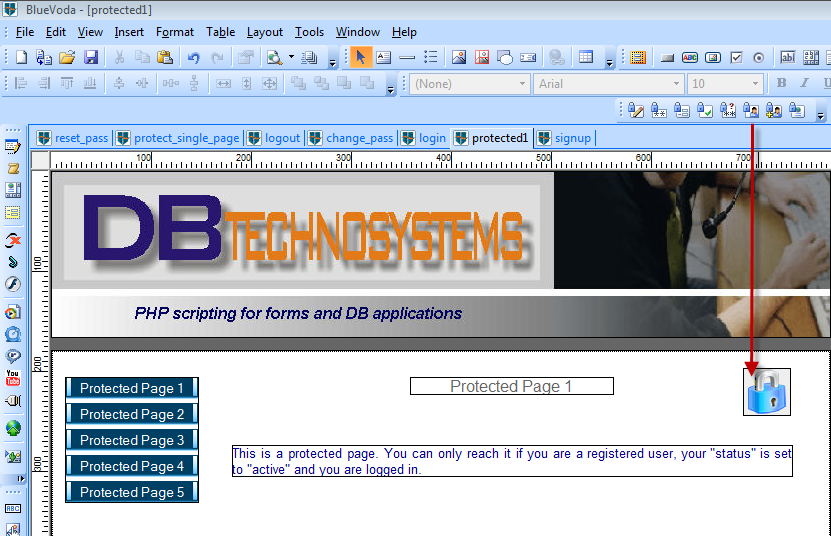
6. Protect Single Page:
This tool allows you to create a password based protection for single pages. It doesn’t use any file, and the password that is necessary to access the page is hard coded in the page itself. When the user that should access the page tries to do so, it will display a form for the necessary log in. In fact, before logging in, you will see this form:
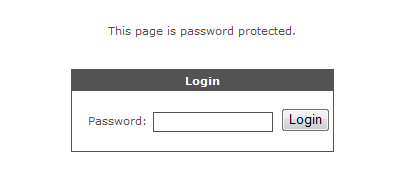
So you will need to provide the necessary password to be allowed access.
In your BV page, you will see just something like the following:
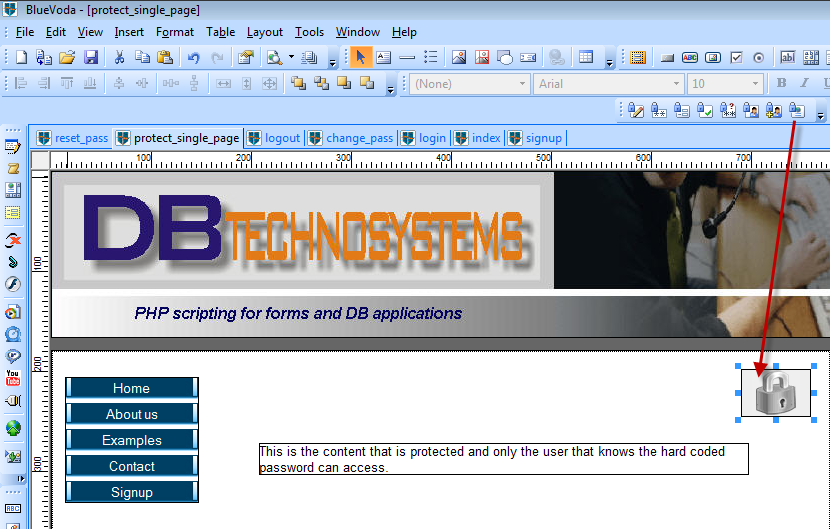
You can make the protection object as small as you like, and place it anywhere in the page.
You can customize the look and set the password by double clicking on the object. The following Properties window will appear:
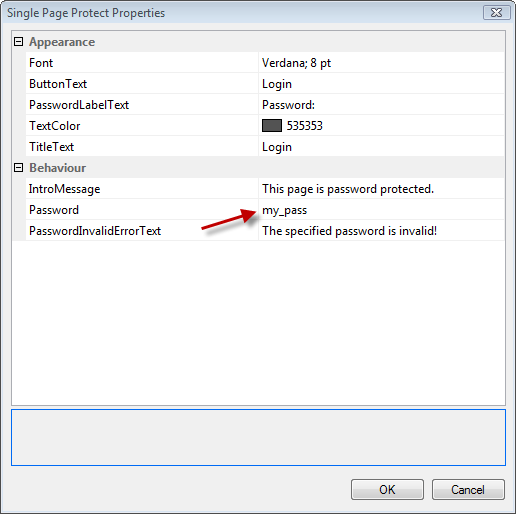
As you see, you need to set the password that will allow access to the page.
7. The Protect Page object:
This object allows you to password protect your pages.
It will verify if the user trying to reach the page is logged in. If he is, it will allow access to the page. If he is not, the script will redirect the user to the so called “Access denied” page. Usually you will need to have, in that page, a link to the Login page.
Of course, you might avoid having such a page, but in that case, you will need to define, as “Access Denied” page, your “Login” page. In that case, set as “Access Denied” page, the “Login” page in the object properties.
Just drag and drop the object anywhere in your page. You can make it as small and place it anywhere you like.
Double click the object and set the Access Denied Page. As mentioned, this page is simply a page that informs the visitor that he has no permission to reach the requested page because he is not logged in. You would normally have links to both the Log In and the Registration pages. Or, make the “Access Denied” page to be your “Login” page.

8. The Admin object:
This is the “core” of the script. Drag the Admin object in your page. The screen that you will be seeing in BV will look like the following Picture 28:
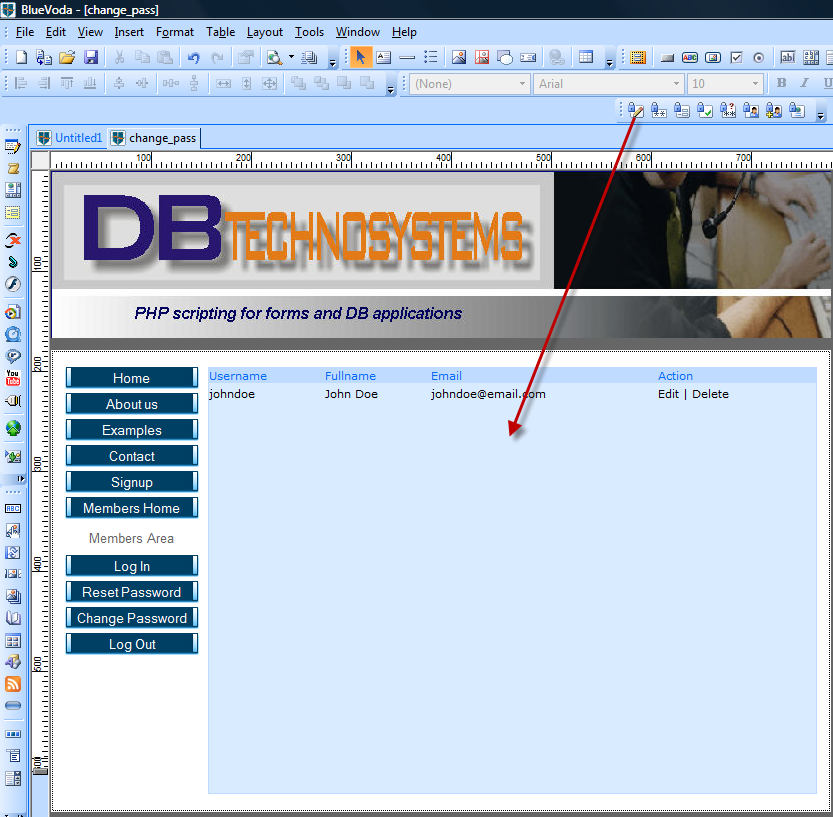
This object allows you to administrate your members. From here you can Add, Edit or Delete a user. It will display a list of all your users, with links for Edit or Delete user. It also contains, at the bottom, a link to Create New User and a link to Logout.
Please note that the page you will create for the Admin, is only a simple “container”. The actual code is NOT contained in the page itself, but it is displayed in an Inline Frame, which will take the same space as the object in your page. So make it large and high enough to display a sufficient number of users. The I-frame will display scroll bars, if necessary, to allow you to scroll down and see the rest of the users that are not immediately visible.
Double click the object and you will see the Properties Window, which looks like the following Picture 29:
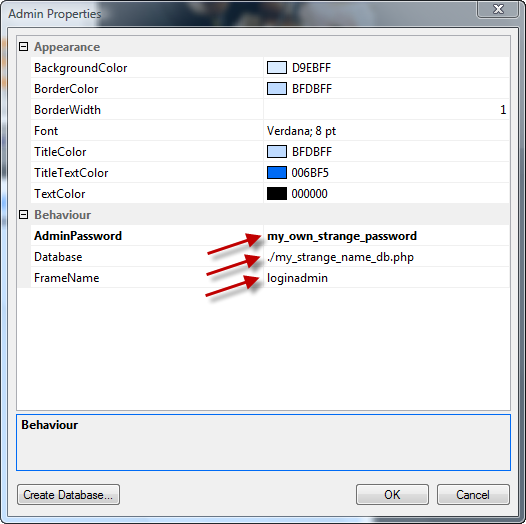
Make sure to provide a “strange” password, for security reasons.
Also type in the Database filename, as you have created it previously. In our example, this was “my_strange_name_db.php”
You can also change the name of the I-frame, if you wish. The default name is “loginadmin”. You can leave it as it is, as there are no security issues with the frame name.
At this point, if you have also created the various error and confirmation pages, as suggested in the above paragraphs, your work is done. You can publish your pages and go live!
Troubleshooting:
1. The most common issue you might have to deal with, is that the the script displays, at some point, “Database file not found”. This is almost always due to one of the following:
1. The database file has not been created
2. The database file has been created, but in a different location / folder than the expected.
3. The database file has wrong permissions (should be 644).
4. The database file is created, but you have typed a wrong filename in the various objects properties dialog window.
In all 3 cases, the steps to debug the problem is the following:
Connect to your site with FTP or File Manager. If you have LOTS of files in your hosting account, probably File Manager will be your only option.
Browse to find the database file (in this example, “my_strange_name_db.php”
If found, check that it is in the same folder (public_html, or other) where the pages have been published.
Check that the file permissions are 644, and if not, change it to 644.
If you can’t find it, it needs creating. Repeat the step “Create Database” as explained in paragraph 1.
If, nevertheless, you still have issues creating this database file, you can follow this workaround:
Open Notepad. Of course, it contains nothing. Go to File ŕ Save As ŕ Select File Type: All files
Save the file as “my_strange_name_db.php” (of course, use the name you want to) .
2. A second issue is that some pages work and some others will not. In most cases, this might be due to wrong database filename typed in the various objects properties.
Security:
Make sure that you use a “strong” password and a strange name for the database filename. Please note that it is NOT necessary that you use the extension “.php” for the database filename. You can use your own strange extension, like “.r12t”. In example, the filename can be “my_strange_name_db.r12t” . This makes it extremely hard for any hacker to guess the filename and gain access to your protected pages. There are others, more complicated ways to protect this file (in example, using an .htaccess file that disallows external access to the file) but the “strange name” method is almost as secure, if you use a complicated name and a strange extension.
For any questions or support, please post on the forum.
You can read and download this tutorial in PDF format, for offline work, at http://www.dbtechnosystems.com/tutor...l/tutorial.php
You can download a zip with example pages, so you can see how the various objects are setup, at http://www.dbtechnosystems.com/tutor...l/BV_Login.zip
Have fun!
BV now offers a simple PHP, file based Login system. This system allows you to create a member’s archive and protect your pages so that only registered members can have access to them. It also allows members to reset their password, in case they have forgotten it, and to change their password.
It provides you with the necessary tool to administrate your members archive by being able to delete, or edit a user’s details, including his “status”.
Since this script is based on PHP code, all the script pages, as well as the protected pages MUST be set to have the .php extension.
Visual customization of the objects that form the script, is quite intuitive and you can experiment yourself. I will limit in explaining how you can setup correctly the script and how you can create the necessary file database, and will provide a generic procedure for the visual customization at the end of this tutorial.
What the script can do and what it can’t do (Please read!) :
As mentioned, the script allows you to create a members database and password protect the pages you like, so that only registered members can get access to them. It also provides a “Single Protect” object (tool) which allows you to password protect a page with a hardcoded password (the password is included in the protection code, and it is not included in the members database file). It is based on a flat file, in other words on a text file that contains the members details. As such, the database file MUST have a “strange” name in order that no one will be able to guess the file name and retrieve the members details. However, for security purposes, the passwords are encrypted before being stored in the file.
Activation of each account can be either immediate (the “status” is set to “Active” ), or manual, after the Administrator reviews the account details. It doesn’t distinguish members in groups, so you can’t set different access levels, nor does it support paid memberships, meaning that if you want members to pay, you need to create payment buttons, and manually set the account status to “Active” after you have payment confirmation.
The script can’t accept additional fields. It will not allow for searches (queries), nor will it allow for members Profile Pages or Members List (at least not for now). It also will not allow you to redirect each user to a specific page of his own (though I will display, at a later stage, a method for doing this, if necessary).
Functionality:
The script consists in a number of objects that each allows you to achieve a specific task. EACH object must be in a page of its own, so don’t add multiple objects in a single page. Let’s see the available objects:
1. The Signup object:
Picture 1.This object allows potential members to signup themselves. So you need to create a page that will allow them to do so. Let’s call this page with the same name as the object, “signup”. Drag the object in your page.
When you do, the object will create in your page, a “signup” form ( see Picture 2).
The available fields, are: Full name, Username, Password, Confirm Password, Email. Each of these titles can be changed through the object properties dialog box. Just double click the object and set the labels as you wish.
Picture 2.
You can also set up the text of the error messages, as well as your email address (where you will receive a notification email upon a new registration.
Of course, you will need to add a link from your other pages to this page, so if a visitor wants to register he can click and get redirected to this page.
The MOST important thing about this page, is the database file creation. To create the members database file, double click the object and the properties dialog box will appear (see Picture 3).
Picture 3
As you can see, in the very bottom, left, there is a button “Create Database…”.
Click it and BV will display the window seen in Picture 4:
Picture 4
Do NOT leave the default name (usersdb.php). Provide a “strange” name like “my_strange_name_db.php” or “users_953Alpha_Mysite_.php” for security reasons.
Click on “Next”. You will see a window similar to the one used for publishing. Select your IP address and fill in your hosting account username and password, then click on “Next” (See Picture 5).
Picture 5
BV will connect to your site and will display all available folders in the root directory. Double click on “public_html” . After that, when the list of folders under ”public_html” appears, click on “Finish”.
Picture 6
If the login script is installed on an add-on domain, you should take one more step, that is, double click the add-on domain folder name, before clicking on “Finish”.
At this point, BV will create an empty Database file with the name you have selected. You should write down the filename that you used, as you will need it for the other objects of the script.
Just for verification purposes, connect to your hosting account with FTP and browse to see if the file has been correctly created. Check also that its permissions are set to 644.
Important: when a user signs up, the script will add his details in the database file. At this point, there are three things that worth mentioning (see Picture 7):
AdminAccountActivation: Setting it to False will result in automatic activation of the new account (Status = Active) , setting it to True will instead result in setting the account status to “Not Active”. If you want to review the new account details before it becomes active, you should set it to “True”.
Database: you should provide the database filename as you have created it.
Destination Page: This is the page that the new member will see after he signs up. Depending on the activation you have selected, you should prepare a page that will inform the new member that his account is active OR that his account will be reviewed by the Administrator before activation. With reference to the above picture I have named this page “signup_confirm.php”.
If everything is ok, your signup page is ready (of course, you might want to proceed to visual customization of the page and object, but we will not further extend on this).
Picture 7
2. The Login object:
Picture 8
Picture 9
This object will create the necessary login form for your members to login (see Picture 9). You can set the text titles and customize it visually as required by double clicking it and setting its properties as required. To do this, double click the object and the properties window will appear (see Picture 10).
Picture 10
The important things are:
Database: this is the database filename, as you have created it, in our example it is “my_strange_name_db.php”
Destination Page: This is the page where users will be redirected after a successful log in. This should be the member’s “homepage” with a menu that will allow members to navigate through the protected pages. In our example, we have called it “destination_page.php” but it can be any page you wish.
Error Page: this is the page where the members will be redirected if the log in is not successful (wrong details, or non existing details). This page should simply contain a message to the member saying that he either typed in wrong details, or he is not registered. Usually, in this page, you should also have a link to the registration page and the “Forgot Password” page. In this tutorial, we have named this page “access_denied.php” but you can name it whatever you like.
Display RememberMe: This option can be set to True or False. Depending on your choice, the Log In form will display or not, a checkbox for the well known “Remember me” feature.
3. The Forgot Password object:
Picture 11
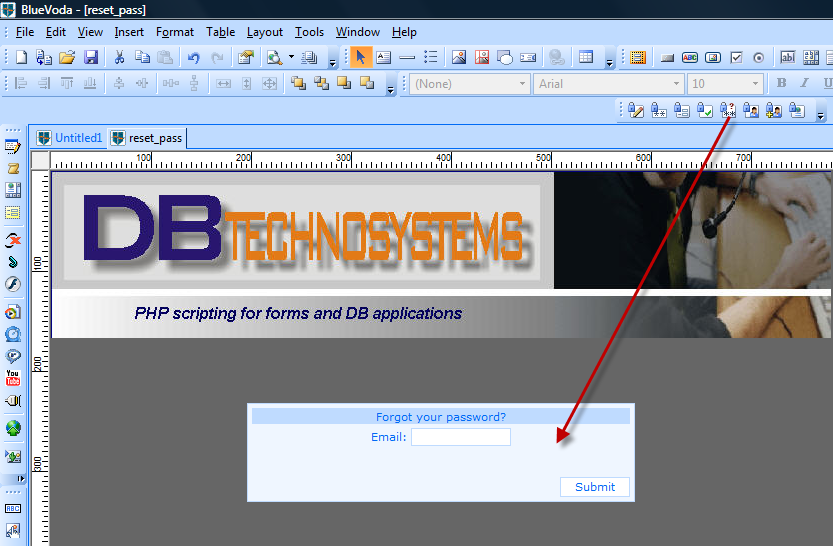
This tool allows your members to reset their password. Since the passwords are stored in the database file in encrypted format, there is no way that the script can actually re-send the current password to the user. So, this tool will reset the password to a new, random one, and will email it to the member. The member will then use this password to Log In, and then he can change the password to whatever he likes (see next paragraph).
The tool will create a form with only an “Email” field and a Submit button.
Picture 12
The member will type his registered email address, and the script will browse through the database file to see if it finds such an email address. If it does, it will reset the password and send an email address to that email address.
As with all other objects, you can visually customize the object. Important points(see Picture 13):
Picture 13
Database: this is the database filename, as you have created it, in our example it is “my_strange_name_db.php”
Destination Page: This is the page where users will be redirected after a successful password reset. This should be a page with a message like ”Your password has been successfully reset, and emailed to your registered email address Please use the new Password to Log In, then you can change your password to whatever you like”. In our example, this pages is named “reset_pass.php” but you can name it whatever you like.
Error Page: this is the page where the members will be redirected if the Password Reset is not successful (wrong or non existing email address). This page should simply contain a message to the member saying that he either typed in wrong details or this email address is not registered in the database. In this tutorial, we have named this page “reset_error.php” but you can name it whatever you like.
From: This is the email address that will appear as the sender of the email. Should be your own, real, email address.
4. Change Password object:
Picture 14
This object allows your members to change their password on their own. It will create a form in your page, as seen in Picture 15:
Picture 15
As with all other objects, you can customize the labels (titles) of the fields, as well as colors and fonts. To do so double click the object and the following Properties Window will appear:
You need to provide, as we did before, the database filename and the Destination page. This page should be a page informing your member that he has successfully changed his password.
5. The Log Out object:
Picture 17
This object allows your members to Log out. It will create a form in your page, as seen in Picture 18:
Picture 18
There are no particular settings for this object, other than the visual ones and the Logout page (see Picture 19). The Logout Page should be another page, with a message to let your member know that he has been logged out, OR it can be any other of the non protected pages (in example, your “index” page).
Picture 19
6. Protect Single Page:
Picture 20
This tool allows you to create a password based protection for single pages. It doesn’t use any file, and the password that is necessary to access the page is hard coded in the page itself. When the user that should access the page tries to do so, it will display a form for the necessary log in. In fact, before logging in, you will see this form:
Picture 21
So you will need to provide the necessary password to be allowed access.
In your BV page, you will see just something like the following:
Picture 22
You can make the protection object as small as you like, and place it anywhere in the page.
You can customize the look and set the password by double clicking on the object. The following Properties window will appear:
Picture 23
As you see, you need to set the password that will allow access to the page.
7. The Protect Page object:
Picture 24
This object allows you to password protect your pages.
It will verify if the user trying to reach the page is logged in. If he is, it will allow access to the page. If he is not, the script will redirect the user to the so called “Access denied” page. Usually you will need to have, in that page, a link to the Login page.
Of course, you might avoid having such a page, but in that case, you will need to define, as “Access Denied” page, your “Login” page. In that case, set as “Access Denied” page, the “Login” page in the object properties.
Just drag and drop the object anywhere in your page. You can make it as small and place it anywhere you like.
Picture 25
Double click the object and set the Access Denied Page. As mentioned, this page is simply a page that informs the visitor that he has no permission to reach the requested page because he is not logged in. You would normally have links to both the Log In and the Registration pages. Or, make the “Access Denied” page to be your “Login” page.
Picture 26
8. The Admin object:
Picture 27
This is the “core” of the script. Drag the Admin object in your page. The screen that you will be seeing in BV will look like the following Picture 28:
Picture 28
This object allows you to administrate your members. From here you can Add, Edit or Delete a user. It will display a list of all your users, with links for Edit or Delete user. It also contains, at the bottom, a link to Create New User and a link to Logout.
Please note that the page you will create for the Admin, is only a simple “container”. The actual code is NOT contained in the page itself, but it is displayed in an Inline Frame, which will take the same space as the object in your page. So make it large and high enough to display a sufficient number of users. The I-frame will display scroll bars, if necessary, to allow you to scroll down and see the rest of the users that are not immediately visible.
Double click the object and you will see the Properties Window, which looks like the following Picture 29:
Picture 29
Make sure to provide a “strange” password, for security reasons.
Also type in the Database filename, as you have created it previously. In our example, this was “my_strange_name_db.php”
You can also change the name of the I-frame, if you wish. The default name is “loginadmin”. You can leave it as it is, as there are no security issues with the frame name.
At this point, if you have also created the various error and confirmation pages, as suggested in the above paragraphs, your work is done. You can publish your pages and go live!
Troubleshooting:
1. The most common issue you might have to deal with, is that the the script displays, at some point, “Database file not found”. This is almost always due to one of the following:
1. The database file has not been created
2. The database file has been created, but in a different location / folder than the expected.
3. The database file has wrong permissions (should be 644).
4. The database file is created, but you have typed a wrong filename in the various objects properties dialog window.
In all 3 cases, the steps to debug the problem is the following:
Connect to your site with FTP or File Manager. If you have LOTS of files in your hosting account, probably File Manager will be your only option.
Browse to find the database file (in this example, “my_strange_name_db.php”
If found, check that it is in the same folder (public_html, or other) where the pages have been published.
Check that the file permissions are 644, and if not, change it to 644.
If you can’t find it, it needs creating. Repeat the step “Create Database” as explained in paragraph 1.
If, nevertheless, you still have issues creating this database file, you can follow this workaround:
Open Notepad. Of course, it contains nothing. Go to File ŕ Save As ŕ Select File Type: All files
Save the file as “my_strange_name_db.php” (of course, use the name you want to) .
2. A second issue is that some pages work and some others will not. In most cases, this might be due to wrong database filename typed in the various objects properties.
Security:
Make sure that you use a “strong” password and a strange name for the database filename. Please note that it is NOT necessary that you use the extension “.php” for the database filename. You can use your own strange extension, like “.r12t”. In example, the filename can be “my_strange_name_db.r12t” . This makes it extremely hard for any hacker to guess the filename and gain access to your protected pages. There are others, more complicated ways to protect this file (in example, using an .htaccess file that disallows external access to the file) but the “strange name” method is almost as secure, if you use a complicated name and a strange extension.
For any questions or support, please post on the forum.
You can read and download this tutorial in PDF format, for offline work, at http://www.dbtechnosystems.com/tutor...l/tutorial.php
You can download a zip with example pages, so you can see how the various objects are setup, at http://www.dbtechnosystems.com/tutor...l/BV_Login.zip
Have fun!


Comment